|
Concluding the theme of how data is stored in computers, in this week’s lesson I focused on how binary can be used to store instructions. Learning Objectives:
Lesson 1: Theory (Instructions) Suggested time: 50 mins Starter I started the lesson by loading the Little Man Computer simulation (http://www.atkinson.yorku.ca/~sychen/research/LMC/LMCHome.html) (Note: requires Java) and, as a recap, explained to students that the main function of the CPU is to fetch and execute the instructions. I then refreshed the students’ memories of how the CPU works by showing them an example set of instructions to add two numbers which I loaded into the simulator (see below).
Main: Next I instructed the students to login to blendspace (http://www.blendspace.com) and read through the PowerPoint I had uploaded (See below) and make notes in Blendspace on how instructions are stored in binary. What is Blendspace? Blendspace is a powerful online collaboration tool which allows you to organize and share content such as videos, images, documents and text using its intuitive drag and drop interface. The tool also allows you to create online lessons by embedding content from popular sites such as YouTube, Google, Vimeo, Flickr etc via its built-in search tool or by uploading content from your computer, Dropbox or Google Drive. One of the most powerful features of Blendspace, and one which lends itself well to this kind of task, is the comment tool. Using the comment tool, students can make and share notes collaboratively. For more information on Blendspace visit: (http://teachwithict.weebly.com/4/post/2013/09/flip-your-classroom-with-blendspace.html) Alternatively, if you do not wish to use Blendspace, you could just email your students the PowerPoint (below) or upload it to your shared area.
Next, I split the class into groups of 2 or 3 and explained to the students that their main task was to create a podcast explaining how instructions are interpreted by the computer in binary. I demonstrated how to create a podcast using GarageBand (Alternatively you could use Audacity (Free). I then gave each group a blank podcast storyboard (see below) along with an example of what I was looking for and explained to the students that they must complete the storyboard and have them approved by me before creating their podcasts.
For hints and tips on creating classroom podcasts, click here: http://recap.ltd.uk/podcasting/info/educatortips.php Lesson 2: Test Suggested time: 50 mins Main: Students completed their podcasts. Tip: For students who do not like recording their voice there are a number of free text-to-speech tools online which allow you to download your text-to-speech sample as an .mp3 / .wav. Here are two of my favourites: AT&T Text to Speech Demo - http://www2.research.att.com/~ttsweb/tts/demo.php fromtexttospeech.com - http://www.fromtexttospeech.com Plenary: I played a sample of students’ podcasts to the rest of the class. (see example below). 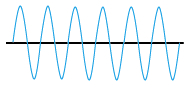 Continuing the theme of how data is stored in computers, in this week’s lesson, I focused on how sound is represented in a computer system. Learning Objectives:
Lesson 1: Theory (Sound) Suggested time: 50 mins Starter: I started the lesson by playing two samples of the same track (Tenacious D - Tribute “The Best Song In The World”), each compressed at different sample rates, which I downloaded from PWNICT: (http://www.pwnict.co.uk/computingGCSE/computingResources.html) - Click on 2.1.4 representation of data --> Lesson 5 Sound in Binary. You can find a direct link to the two samples below. After playing the two samples, I asked the students what they noticed about the two tracks. Theory: Next I explained that, in the previous lessons, we looked at how numbers and pictures etc. are stored in a computer using binary and that in this lesson we will explore how a computer stores sound. I explained that sound travels as a wave and showed students the following example. 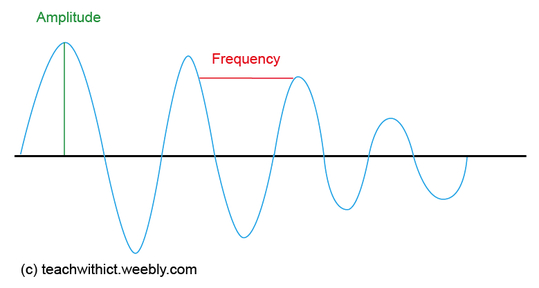 Next, I explained that amplitude controls how loud the sound is and the frequency controls the pitch. I then displayed the following example on the board: 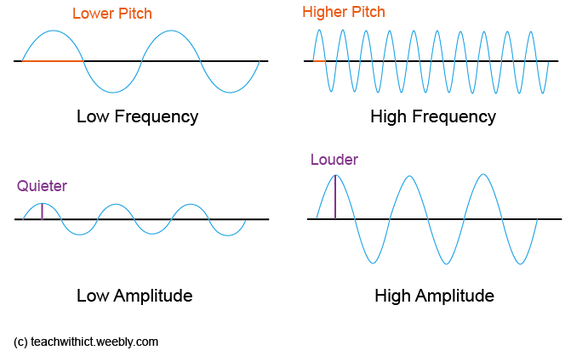 I followed this by explaining that sound waves are analogue and that, in order to store the waves digitally on the computer, we need to convert the waveform into a numerical representation so that the waveform can be stored in binary. To do this, we use an Analogue-to-Digital Convertor (ADC). I described how the ADC works by taking samples of the sound wave at regular intervals and displayed the following diagram: 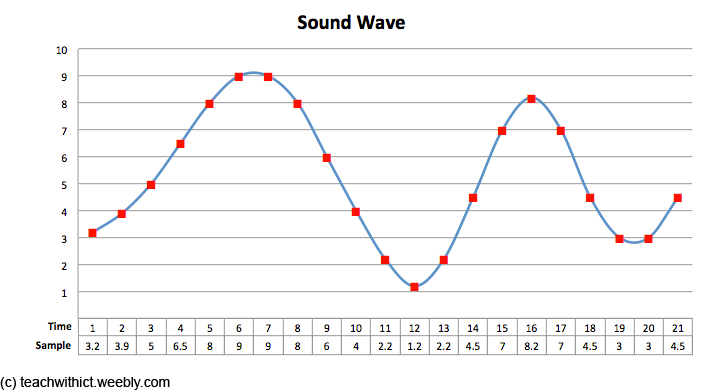 Next, I explained how the quality and size of the file is affected by two factors - sample rate and bit rate. I explained that the sample rate refers to the number of samples taken every second and that the greater the frequency of the samples, the better the sound quality. I also explained that the bit rate refers to the number of bits used to store each sample and that the more bits that are sampled, the better the accuracy of the file but also the greater the file size. 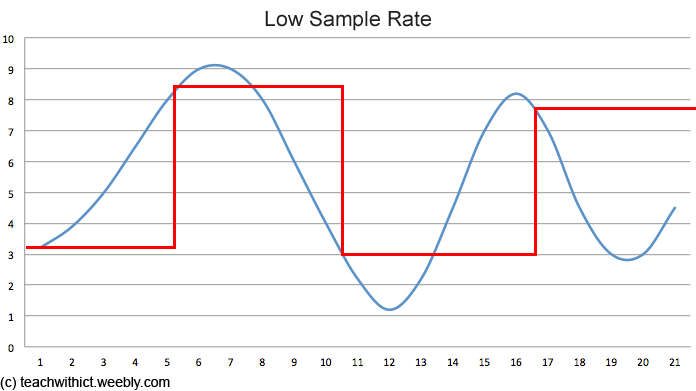 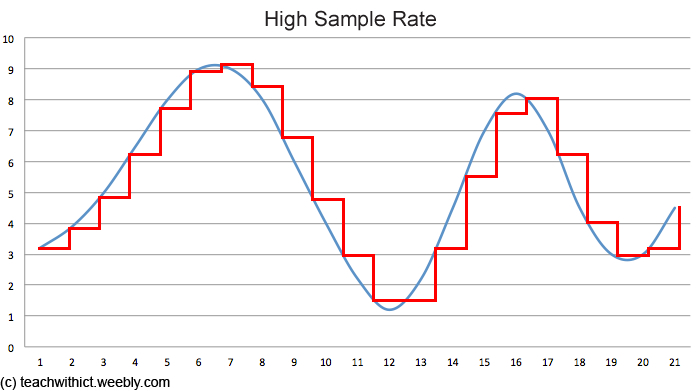 Finally, I played the two samples from the beginning of the lesson and asked the students if they could identify which one was converted using the lower sampling rate. Main: Students were given the following spreadsheet and instructed to fill in the following samples and map out the sound wave:
Samples: 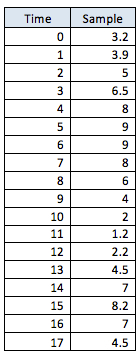 Alternative: Alternatively, students could use Audacity (Free) to explore how sound is stored on a computer. Students could be given an .MP3 file which they open in Audacity and zoom in to see the value of each sample. Students could then export the sound file using different sample rates and investigate the effect the sample rate has on sound quality. 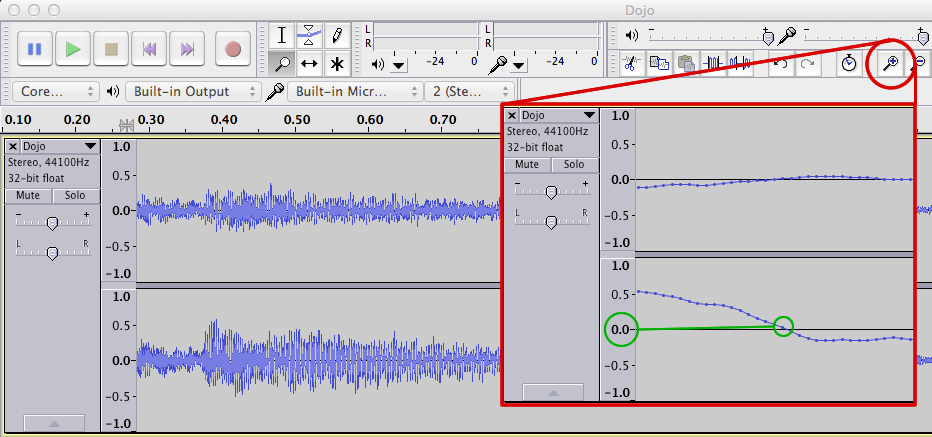 Homework: Students were instructed to update their class revision wiki. Useful Resources: PWNICT - Excellent PowerPoint presentation from PWNICT – Computing Resources explaining how sound is stored on a computer - Click on 2.1.4 representation of data --> Lesson 5 Sound in Binary Classzone – Frequency / Amplitude simulator Binary representation of sound worksheet – Courtesy of Emma Partridge (via CAS). Download the worksheet here: http://community.computingatschool.org.uk/resources/1035 Extract from the CHRISTMAS LECTURES 2008: Chris Bishop - The Ghost in the Machine showing how sound is stored on a computer - Skip to 13:40.
Lesson 2: Python
Suggested time: 50 mins Main: Students were instructed to setup their Raspberry Pis and to launch IDLE 3. Students were then asked to continue to work through Mark Clarkson’s Introduction to Python booklet: (http://community.computingatschool.org.uk/resources/14) Alternative: Alternatively, if you do not have access to a set of Raspberry Pis, students can still complete the Python challenges: To install Python for FREE, go to the python.org website and download a standard installation of the latest version of Python. This will provide you with everything you need.  In this week’s lesson, I continued the theme of how data is stored in computers, this week focusing on how characters are represented in a computer system. Learning Objectives:
Lesson 1: Theory (Characters) Suggested time: 50 mins Starter: Students were given the following worksheet and asked to complete the tasks:
Main: I explained that, in the previous lesson, we have looked at how numbers are represented in a computer using binary. I then explained that characters are converted in the same way using something called a character set. Next, I explained that one of the most commonly used character sets is ascii (American Standard Code for Information Interchange). I then showed students the full 7-bit ascii table (See below).
I then explained that the ascii character set uses 7 bits which allows the computer to encode up to 128 characters. Finally, I gave students each a worksheet containing part of the ascii table (containing the letters A to Z in uppercase and lowercase) and asked the students to fill in the gaps in the table. Once complete, I asked the students to attempt the challenges on the worksheet (see below)
Resources: Representation of text - http://web.eecs.utk.edu/research/cs100modules/module3/index.html Ascii text to Binary converter - http://www.binaryhexconverter.com/ascii-text-to-binary-converter Ascii Binary conversion chart - http://www.nthelp.com/ascii.htm Text to Ascii and Binary converter - http://www.computingacademy.org.uk/text-ascii-and-binary-converter Lesson 2: Programming (Python)
Suggested time: 50 mins Main: Students were instructed to setup their Raspberry Pis and to launch IDLE 3. Students were then asked to continue to work through Mark Clarckson’s Introduction to Python booklet: (http://community.computingatschool.org.uk/resources/14) Alternative: Alternatively, if you do not have access to a set of Raspberry Pis, students can still complete the Python challenges: To install Python for FREE, go to the python.org website and download a standard installation of the latest version of Python. This will provide you with everything you need. |
AuthorSimon Johnson 
Microsoft Innovative Educator Expert / MIE Trainer

Minecraft Cert. Educator / Global Mentor
CAS Master Teacher
Raspberry Pi Cert. Educator

Tickle Ambassador
Archives
June 2017
CategoriesAll Algorithms Cpu Fundamentals Hardware Input & Output Memory OCR A451 Software Storage |
|||||||||||||||||||||||||||||||||||||||
Search by typing & pressing enter
 RSS Feed
