|
In this week’s lesson, I continued the theme of how data is stored in computers, this week focusing on how a computer stores an image. Learning Objectives:
Lesson 1: Theory (Images) Suggested time: 50 mins Starter: I started by displaying a photograph of my Christmas jumper on the board and asking students what an image is made up of. I then explained that Pixel is short for Picture Element and showed the students a close up of my jumper showing each of the individual pixels: 


I explained that the image in my example was 1024 pixels x 768 pixels and that we call this the picture’s resolution. Main: I began by displaying a simple 1-bit image on the board and asked students to suggest how it could be converted to binary: 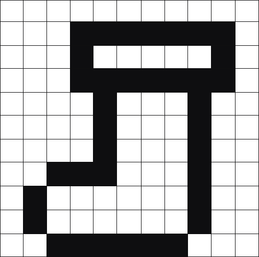
The students, at first, suggested using 00 for “white” and 01 for “black”. I then asked if there was an even simpler way, to which the students suggested 0 for “white” and 1 for “black”. I then showed students the previous example in binary: 
I explained that images are stored in “scan lines” and that each line is encoded from left to right --> top to bottom. Next, I asked students how we could represent 4 colours in binary. Once they got the correct answer, I showed them the following example: 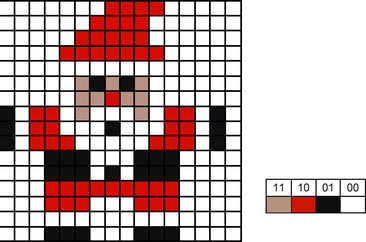
I followed this by displaying the following two images side-by-side on the board and explained that, for some reason, the computer had missed out two lines of code when importing the image. I then asked for volunteers to fill in the gaps: 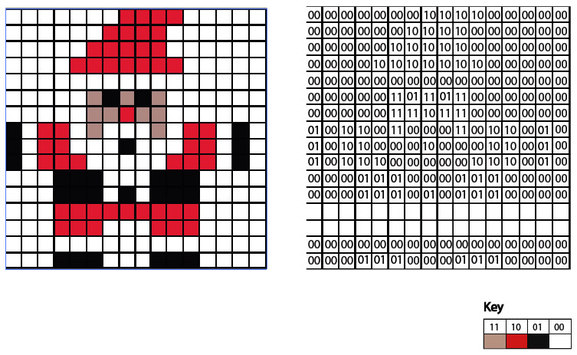
I explained that we call this representation of colours a “bit-plane” and that each bit doubles the number of available colours i.e. 1-bit would give us 2 colours, 2-bits would give us 4 colours and 3-bits would give us 8 colours etc. I then asked students to suggest how we could store more colours such as 16, 256 etc. Next, I gave each students a pre-printed computer science cracker joke, each with a different challenge attached – tasks based on level of ability. (See below). I then instructed the students to complete the challenge attached to their cracker joke.
Extension task: I asked some students to share the hexadecimal / binary code of their favourite bitmap image with a classmate to see if they could convert it back to the original image. Next I wrote an example binary code on the board and asked the students how the computer would interpret the numbers (the idea being for the students to ask questions such as how many colours etc.) I followed this by asking students what does a computer need to know to be able to convert the image. I then explained that, in order for the computer to interpret the file, the computer needs to know:
I then explained that we call this “metadata” I finished by recapping the learning objectives using the Pose, Pause, Pounce and Bounce method. Example: Pose a question to the whole class e.g. Explain how a 16 colour image can be represented in binary Pause to give students time to digest the question and think of their answer. If the students are engaged, try holding the pause for a little while longer to build up the tension. Pounce: Quickly, select a student to answer the question. i.e. Insist the answer to the question comes from student A and possibly student B, directly and fast! Obviously, plan in your mind who you are going to direct the questions to before hand. Bounce the question or student's response on to another student (immediately after the pounce). e.g. Ask them if they agree with the students previous answer and to explain why. For more information about the Pose, Pause, Pounce and Bounce technique, visit: @teachertoolkit - http://teachertoolkit.me/2013/01/04/pppb-version2/ Keywords: 
Lesson 2: TouchDevelop Festive Pixel Challenge
Suggested time: 50 mins Main: Keeping the theme of pixels, students were shown an 8-bit image created using touchdevelop. Click here to see example. Students were then directed to the TouchDevelop Challenge Hour of Code tutorials (touchdevelop.weebly.com/hoc) and asked to create a festive 8-bit image of their very own. Once completed, students where asked to submit their apps to the TouchDevelop Challenge website: http://touchdevelop.weebly.com/student-blog.html Below is a sample of some of the artwork created by the students during the lesson: In this week’s lesson, I introduced my students to Hexadecimal - explaining why it’s used and how to convert to binary / denary and back again. Learning Objectives:
Lesson 1: Theory (Hexadecimal) Suggested time: 50 mins Starter: I started by showing two numbers on the board (one in binary and one in hex). 1101 1001 C9 I then asked the students, “Which is easiest to remember?” I explained to students that we often find it difficult to remember long sequences of numbers so, to make life easier, we can break the number down from 4 bits (a nibble) to 1-bit. Demonstration (Hexadecimal): Next, I explained that the smallest value we can have in 4-bits (nibble) is 0000 (0 in denary) and the largest value is 1111 (15 in denary) and that we needed to represent each value with a single digit. I then displayed the following table on the whiteboard and asked students to fill in boxes 0-9:
I then explained that when we reach 10, we hit a problem as we can only use the numerical values 0 – 9. I then asked the students to suggest ways we would represent the last 6 numbers without using numbers. I then explained that, to get around this problem, we substitute the numbers 10 to 15 with the letters A to F. I explained that we call this system Hexadecimal (or Hex for short). I followed this by showing the students the following table:
Next, I showed the students, using the following table, what happens when we get to the number 16:
I explained that when we get to 16, a 1 is added to the front of the next number (highlighting the similarity to the denary system when we go from 9 to 10). Next, I split the class into groups of three and gave each group a copy of the following table. I then asked them to fill in the blanks:
I finished by displaying the following table on the board and explained how it could help them in their exam:
Activity 1 (Denary <--> Hex): Next I explained that, for the exam, students are expected to be able to convert binary to hexadecimal. I then showed the students the following video: I then showed them an example exam question and challenged them solve it: (a) Convert the hexadecimal number 6A to denary. (You must show your working out). ................................................................................................................................. ................................................................................................................................. ............................................................................................................................ (2) I followed this by giving students a series of mini challenges (See answer sheet at bottom of this page):
Activity 2 (Binary <--> Hex): Finally I explained that, also for the exam, students are expected to be able to convert binary to hexadecimal. I explained that, in the exam, students are expected to be able to convert 8-bit binary numbers to hex. I then demonstrated how to do this using the following example: 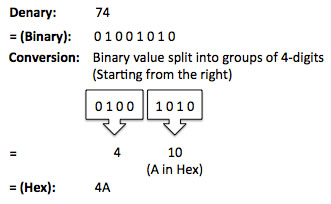 This was supported by the following help sheet:
I then showed the students another example exam question and challenged them solve it: (a) Convert the binary number 00111101 to hexadecimal. ................................................................................................................................. ................................................................................................................................. ............................................................................................................................ (2) Plenary: I finished by putting this all into context. I displayed the following table on the board and asked students if they recognised it. I then asked if they spotted anything familiar (based on the lesson). 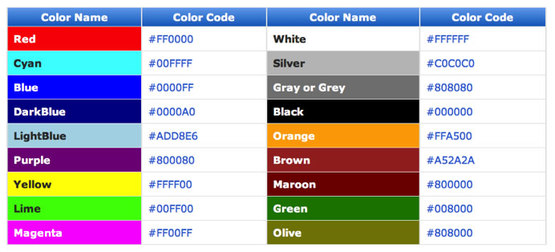 I explained that #FFFFFF = 1111 1111 1111 1111 1111 1111 in Binary which is 16,777,215 in Denary which also happens to be the same number of colours in a web palette! I then asked students to think what it would be like to have to use binary to change the colour of a webpage in HTML! Homework: Students were instructed to update their class revision wiki. Answer Sheets: Starter:
Activity 1:
Useful Links: How to do Decimal to Hexadecimal Conversion How to do Binary to Hexadecimal Conversion Lesson 2: Raspberry Pi - Introduction to Python
Suggested time: 50 mins Main: Students were instructed to setup their Raspberry Pis and to launch IDLE 3. Students were then asked to follow Mark Clarckson’s Introduction to Python booklet: (http://community.computingatschool.org.uk/resources/14) Alternative: Alternatively, if you do not have access to a set of Raspberry Pis, students can still complete the Python challenges: To install Python for FREE, go to the python.org website and download a standard installation of the latest version of Python. This will provide you with everything you need. In this week’s lesson, I continued the theme of how data is stored in computers, this week focusing on binary addition. Learning Objectives:
Lesson 1: Theory (Binary Addition) Suggested time: 50 mins Starter: I started with a fun starter activity courtesy of Mark Ward via CAS called Binary Bingo. To download the activity, click here. Each student was given a bingo card and numbers were picked at random using a free random name selector (see Classroom Management Tools). The first student to get a full house was the winner. Main: I began by writing a simple sum (adding to denary numbers together) on the board: 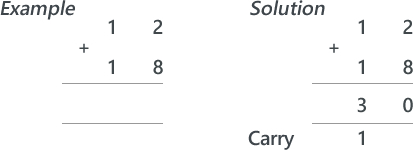 I then asked for a volunteer to solve it (showing all working out). Next, I introduced a simple binary sum: 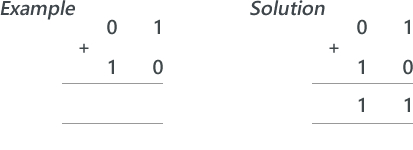 I explained that adding binary numbers is exactly the same as adding denary numbers however, instead of carrying groups of ten, you carry groups of 2. I followed this by writing a couple more simple binary sums on the board and asked for volunteers to attempt to solve these. Next I explained that when we add two 1s we need to carry over to the next column. I demonstrated this using the following sum: 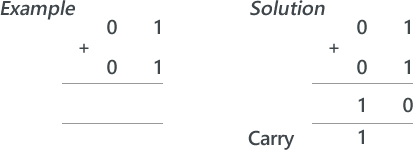 I followed this by asking students to work out the following (explaining their working out): 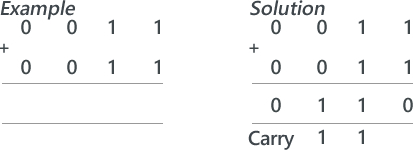 Finally, I wrote the following binary sum on the board and asked the students to solve it. I then asked the students if they spotted the problem. 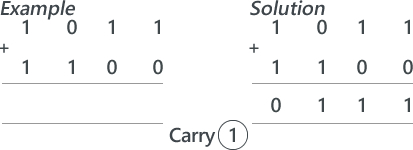 I explained that, if we only have 4 bits to store the result, there would be no room for the final carry – resulting in the wrong answer. I explained that when there isn’t room to store the resulting calculation, we get an error which we call overflow. Finally, I gave students a series of binary addition challenges courtesy of Chris Barnard via CAS. You can download the worksheet and answer sheet here: Binary Addition Exercise Extension: Students were directed to the following YouTube video explaining binary subtraction: Plenary: Students played the CISCO Binary Game: http://forums.cisco.com/CertCom/game/binary_game_page.htm Resources: Useful resources: Binary Calculator – http://gwydir.demon.co.uk/jo/numbers/binary/add.htm Binary Arithmetic Task - http://www.allaboutcircuits.com/worksheets/bin_math.html Lesson 2: Raspberry Pi - Python Challenge
Suggested time: 50 mins Main: Students were instructed to setup their Raspberry Pis and to launch IDLE 3. Students were then asked to attempt a series of introductory Python challenges courtesy of Tom Gilmour via CAS: http://community.computingatschool.org.uk/resources/332 Alternative: Alternatively, if you do not have access to a set of Raspberry Pis, students can still complete the Python challenges: To install Python for FREE, go to the python.org website and download a standard installation of the latest version of Python. This will provide you with everything you need. |
AuthorSimon Johnson 
Microsoft Innovative Educator Expert / MIE Trainer

Minecraft Cert. Educator / Global Mentor

CAS Master Teacher

Raspberry Pi Cert. Educator

Tickle Ambassador
Archives
June 2017
CategoriesAll Algorithms Cpu Fundamentals Hardware Input & Output Memory OCR A451 Software Storage |
||||||||||||||||||||||||||||||||||||||||||||||||||||||||||||||||||||||||||||||||||||||||||||||||||||||||||||||||||||||||||||||||||||||||||||||||||||||||||||||||||||||||||||||||||||||||||||||||||||||||||||||||||||||||
Search by typing & pressing enter
 RSS Feed
