|
In this week’s lesson, I continued the theme of how data is stored in computers however, this time, focusing on binary to denary conversion. Learning Objectives:
Lesson 1: Theory (Binary) Suggested time: 50 mins Starter: I started by displaying my favourite binary joke on the board: “There are 10 types of people in the world: Those who understand binary and those who don’t” After a quick scan of the classroom to gage how many people got the joke, I explained to the class that I would reveal the punchline at the end of the lesson. Main: I began by explaining that data in computers is stored and transmitted as a series of zeros and ones. I followed this with a fun and engaging activity I found on CS Unplugged called counting the dots: http://csunplugged.com/sites/default/files/activity_pdfs_full/unplugged-01-binary_numbers.pdf I started by choosing 5 volunteers, and gave each volunteer one of five cards (each with dots on one side and nothing on the other). See attached: I began by asking the students what they noticed about the number of dots on each card (I waited for the students to identify that each card had twice as many dots as the previous card) I then asked students how many dots would the next two cards have and why. Next, I asked the 5 volunteers to flip their cards over one at a time and, with input from the rest of class, explained what each card represented. I followed this by asking the volunteers to make other numbers such as 6 (4-dot and 2-dot card) and 21 (16-dot, 4-dot and 1-dot cards). I then asked the students to flip over all their cards (so that all the dots were facing forward) and asked the rest of the class to calculate the total and explain how they worked it out. Finally, I challenged the volunteers to count from zero to 31 by flipping the cards in sequence. For an example of how to deliver this activity, see the video below: I finished this with a selection of worksheets courtesy of CS Unplugged (Click here) Plenary: Finally, I showed the binary joke on the board again and asked the students to explain the punch line. Lesson 2: Raspberry Pi Challenge Suggested time: 50 mins Starter: I started by asking the students “What factors (things/characteristics) make a difference to a computer’s performance?” I asked students, in pairs, to write down their answers and followed this with a discussion about obvious factors such as speed. Main: Next, to introduce the main task, I asked students “How can we test how factors such as CPU, memory and secondary storage can affect the performance of a computer?” The aim here was to encourage students to think about benchmarking through controlled experiments and recording their findings (I linked this to experiments they may have conducted in science and students to discuss how they could make sure the results of the experiments were both accurate and reliable). I then split the students into small groups of 3 and gave each group a copy of the OCR Classroom Challenge – Worksheet 8: How hardware characteristics can affect the performance of a computer (Click here). For the teacher version, which includes suggested possible outcomes, click here. I then instructed the students to power up their Raspberry Pis and attempt task 2 of the worksheet. (Note: This activity provides a perfect opportunity to reinforce hardware theory and encourages students to investigate how hardware characteristics such as CPU speed, memory and secondary storage can affect the performance of a computer.) Resources:
Extension:
Those students who were able to complete task 2, with time to spare, were asked to attempt task 3 of the worksheet. Alternative: Alternatively, if you do not have access to a set of Raspberry Pis, students can attempt some more hour of code tutorials on TouchDevelop: https://www.touchdevelop.com/hourofcode Plenary: Students were asked to share their results from Raspberry Pi task with the rest of the class and discuss the findings. Teaching Computer Science - Day 9: Bits n bobs Not much to report this week as I have been at the UK Skills Show demonstrating Kodu, TouchDevelop and Project Spark however, in my absence, I left this cover lesson on "Units of data". Learning Objectives:
Lesson 1: Theory (Units of Data) Suggested time: 50 mins Starter: Students were asked to watch the video “Units of Data Measurement” from 60secondmindmeld.com. After watching the video, students completed the following worksheet: Units of Data Worksheet Main: Students were asked to investigate different units of data and to create a revision resource which explains the terms bit, nibble, byte, megabyte, gigabyte and terabyte. Students were then instructed to create a new page in their revision wiki called “Units of data” and upload their finished resource. Resources: PWN ICT – Units of Data.pptx Teach-ICT - Representing Data OCR - Representation of data in computer systems Cambridge GCSE Computing Online - Definitions of units Lesson 2: Programming (TouchDevelop)
Suggested time: 50 mins Main: Students were instructed to sign in to TouchDevelop (www.touchdevelop.com) and attempt the hour of code tutorials: https://www.touchdevelop.com/hourofcode Once completed, students where asked to submit their apps to the TouchDevelop Challenge website: http://touchdevelop.weebly.com/student-blog.html Below is a sample of some of the games created by the students: Falling rocks game: https://www.touchdevelop.com/hvlca Another falling rocks game: https://www.touchdevelop.com/fkspa Turtle drawing: https://www.touchdevelop.com/mbiib Loves me not game: www.touchdevelop.com/sliwb Plenary: Students were invited to try out each other’s apps. 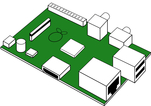 In my eighth lesson, I decided to give my students a test to see what they had learnt so far. I followed this with an introduction to the Raspberry Pi. Learning Objectives:
Lesson 1: Theory Test Suggested time: 50 mins Test: I used the Hardware theory test (OCR Unit 2.1.2) courtesy of Mark Clarkson. You can download the test for FREE here: OCR GCSE Computing Hardware Unit Test Plenary: I asked students to swap papers and went through the answers. I also explained to students the model answers using the marking criteria (Click here) Lesson 2: Introduction to the Raspberry Pi Suggested time: 50 mins Starter: I split the class into groups of 4. I then gave each group a boxed Raspberry Pi and worksheet (See below).
After handing out the worksheets, I asked the students to un-box their Raspberry Pis and try to identify each of the different parts of the device using their worksheet. (This is also a great opportunity to recap some of the Hardware theory elements such as CPU, Input / Output, memory and storage etc.). Alternatively: You could also use the Interactive Flash based Drag-and-drop version which can be found on the OCR website: http://www.ocr.org.uk/Images/127399-raspberry-pi-drag-drop-activity.swf Once all the students had filled in their worksheets, I reviewed their answers. What is a Raspberry Pi? The Raspberry Pi is a low cost, credit-card sized, programmable computer which has been developed by the Raspberry Pi Foundation. How can I get hold of one? You can buy the Raspberry Pi through a variety of online retailers such as Amazon, RS Components, CPC, maplin etc. How much does one cost? The Model A will typically cost £20 and the Model B £30. Note: this does not include the SD Card, keyboard, mouse and monitor required to use the Pi. It is assumed that most of these components will already available in school. SD cards can be picked up relatively cheaply online. To find out more about the Raspberry Pi, visit the official website. Note: As part of their drive to encourage the teaching of computing, OCR are offering free Raspberry Pis to schools who wish to increase the engagement of Computing and IT. To express your interest in receiving FREE Raspberry Pis for your school, visit the following link and complete the attached form: http://www.ocr.org.uk/qualifications/by-subject/computing/free-raspberry-pi/ Main:
I divided the class into pairs and gave each pair a Raspberry Pi, SD Memory Card and set of instructions for setting up the Raspberry Pi. I then instructed the students to connect and setup their Pis. Note: The Raspberry Pi do not come with a pre-installed Operating System therefore, the students will have to install the OS themselves. This is a good opportunity to introduce the software theory element of the course and explain the importance of the Operating System. You can download a disk image of the operating system from the official Raspberry Pi website www.raspberrypi.org/downloads (The recommended operating system is Raspbian “wheezy”). In order to write the disk image (.img) file to the SD card you will need a program called Win32 Disk Imager. Download Here. Due to network restrictions and as Win32 Disk Imager, if used incorrectly, can harm your machine, for the purpose of this task, I provided the students with an old laptop with the Disk Imager software already installed and a copy of the latest Raspberry Pi OS in (.img) format on a USB pen. Extension Task: Students attempted the OCR “Raspberry Pi Architecture Classroom Challenge” http://www.ocr.org.uk/Images/125296-classroom-challenge-architecture-learner-sheet.pdf Model answers for the challenge can be found here: http://www.ocr.org.uk/Images/125297-classroom-challenge-architecture-teacher-sheet.pdf |
AuthorSimon Johnson Microsoft Innovative Educator Expert / MIE Trainer
Minecraft Cert. Educator / Global Mentor
CAS Master Teacher
Raspberry Pi Cert. Educator
Tickle Ambassador
Archives
June 2017
CategoriesAll Algorithms Cpu Fundamentals Hardware Input & Output Memory OCR A451 Software Storage |
||||||
Search by typing & pressing enter



 RSS Feed
