|
This week the majority of my class were getting soaked on a Geography field so, with most of my class missing and with the 1st controlled assessment out of the way, I decided to have some fun with the Raspberry Pis and Minecraft Pi edition. What is Minecraft Pi: Minecraft: Pi Edition is a version of Minecraft that’s designed to work on the Raspberry Pi. The Pi edition has the added feature that you can program it using either Python or Java. What you will need:
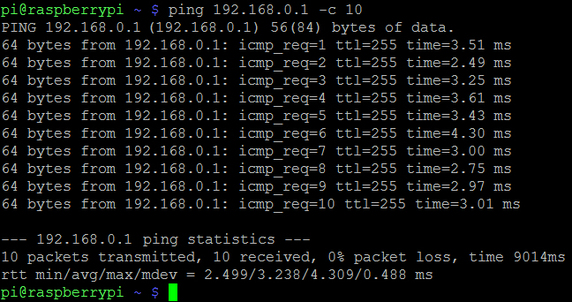
* This setup is designed for 4-8 students working in pairs (ideal for an after-school club). You may need to add more routers / Raspberry Pis depending on the size of your class. Note: If your want to do this with a whole class, look out for my blog post on networking the Raspberry Pi (coming soon!) ** This lesson assumes that students already have some experience of using the Raspberry Pi and that they have already installed the Raspbian Operating System. To find out how, click here Starter: I got students to setup their Raspberry Pis and gave them a copy of the Minecraft Pi installer files (along with installation instructions). You can find the instructions here: http://pi.minecraft.net Activity 1 (Installing & getting to know Minecraft Pi): After all of the students had installed Minecraft Pi edition onto each of their Pis, I gave them a little time to play around with Minecraft and get to know the controls. Activity 2 (Networking the Raspberry Pis): After about 20 minutes or so of playing around, I invited the students to the front of the class and explained to them that they were going to network their Raspberry Pis. I explained that every computer has a unique IP address and that this unique address enables it to communicate over a wide area such as the Internet. I explained that the IP address is made up of four numbers (ranging from 0 to 255) and separated by 3 dots. I then showed the following example on the board: 192.168.0.1 I explained that the IP address can be either entered in manually or can be configured automatically using a Dynamic Host Configuration Protocol (DHCP) Server. I explained that, because our router had a built-in DHCP server, the router would automatically assign a unique IP address to each of the Raspberry Pis once they are connected to the network. I then asked the class what they thought the benefit are of using a DHCP server – looking for answers such as “You don’t have to manually assign the IP address for every device on the network” and “The DHCP will ensure that every device has a unique IP address” etc. Note: All modern routers should have a built-in DHCP server and this service will normally be turned on by default. The Raspberry Pi will automatically send out DHCP request as soon as it is connected to the network and therefore should be assigned an address automatically without any user intervention. Extension: At this point, you could also discuss other significant network terms such as default gateway, subnet mask, broadcast, DNS, MAC address etc., however, as I will be looking at networks in more detail later on in the course, I felt that it was beyond the scope of this lesson. Next, I gave each student a CAT 5 lead and asked them to connect one end to their Raspberry Pi and the other end to a spare port on the Router. Once the students had done this, I asked them to test if their device had successfully connected to the network by checking to see if it had a valid IP address. To check that the Raspberry Pi has a valid IP address, open an LX Terminal session: Then, type in the command: ip addr. You should see similar to the following output: If everything has been setup correctly, your Raspberry Pi should have a valid IP address. In the screenshot above, the Raspberry Pi has been configured with the following IP address: 192.168.0.90 Next, I instructed the students to test the network further by pinging the router. You can obtain or manually change the routers IP address by logging into the router itself (See your routers instruction manual). Usually, by default, the IP address of the router will be 192.168.0.1 To ping the router: Open an LX Terminal session then type in the command: ping followed by the IP address of your router. In our case, the students typed in ping 192.168.0.1 See below: This image above shows a ping between a Raspberry Pi and the router which, in this case, has an IP address of 192.168.0.1 The –c 10 option sends 10 packets and the echo replies are shown above with the time taken. Activity 3: (Multiplayer Minecraft Pi) Finally, once all the students had successfully networked their Raspberry Pis, I asked one of my students to launch Minecraft Pi edition on their Raspberry Pi and asked him to “Start Game”. Once Minecraft had loaded, I then asked the rest of the class to also launch Minecraft on their Pis however, this time, to “Join Game”. We finished the lesson with a bit of Multiplayer Minecraft! Hint: When the other students click on “Join Game”, they will need to select “Steve Pi” - Don’t ask me why :) Resources: http://pi.minecraft.net - Installation instructions and download link for Minecraft Pi edition http://www.ocr.org.uk/qualifications/by-subject/computing/raspberry-pi/ - OCR Raspberry Pi: Getting started tutorials http://www.raspberrypi.org/help/quick-start-guide/ - Raspberry Pi quick-start guide Comments are closed.
|
AuthorSimon Johnson Microsoft Innovative Educator Expert / MIE Trainer
Minecraft Cert. Educator / Global Mentor
CAS Master Teacher
Raspberry Pi Cert. Educator
Tickle Ambassador
Archives
June 2017
CategoriesAll Algorithms Cpu Fundamentals Hardware Input & Output Memory OCR A451 Software Storage |
Search by typing & pressing enter


 RSS Feed
