|
Concluding the theme of how data is stored in computers, in this week’s lesson I focused on how binary can be used to store instructions. Learning Objectives:
Lesson 1: Theory (Instructions) Suggested time: 50 mins Starter I started the lesson by loading the Little Man Computer simulation (http://www.atkinson.yorku.ca/~sychen/research/LMC/LMCHome.html) (Note: requires Java) and, as a recap, explained to students that the main function of the CPU is to fetch and execute the instructions. I then refreshed the students’ memories of how the CPU works by showing them an example set of instructions to add two numbers which I loaded into the simulator (see below).
Main: Next I instructed the students to login to blendspace (http://www.blendspace.com) and read through the PowerPoint I had uploaded (See below) and make notes in Blendspace on how instructions are stored in binary. What is Blendspace? Blendspace is a powerful online collaboration tool which allows you to organize and share content such as videos, images, documents and text using its intuitive drag and drop interface. The tool also allows you to create online lessons by embedding content from popular sites such as YouTube, Google, Vimeo, Flickr etc via its built-in search tool or by uploading content from your computer, Dropbox or Google Drive. One of the most powerful features of Blendspace, and one which lends itself well to this kind of task, is the comment tool. Using the comment tool, students can make and share notes collaboratively. For more information on Blendspace visit: (http://teachwithict.weebly.com/4/post/2013/09/flip-your-classroom-with-blendspace.html) Alternatively, if you do not wish to use Blendspace, you could just email your students the PowerPoint (below) or upload it to your shared area.
Next, I split the class into groups of 2 or 3 and explained to the students that their main task was to create a podcast explaining how instructions are interpreted by the computer in binary. I demonstrated how to create a podcast using GarageBand (Alternatively you could use Audacity (Free). I then gave each group a blank podcast storyboard (see below) along with an example of what I was looking for and explained to the students that they must complete the storyboard and have them approved by me before creating their podcasts.
For hints and tips on creating classroom podcasts, click here: http://recap.ltd.uk/podcasting/info/educatortips.php Lesson 2: Test Suggested time: 50 mins Main: Students completed their podcasts. Tip: For students who do not like recording their voice there are a number of free text-to-speech tools online which allow you to download your text-to-speech sample as an .mp3 / .wav. Here are two of my favourites: AT&T Text to Speech Demo - http://www2.research.att.com/~ttsweb/tts/demo.php fromtexttospeech.com - http://www.fromtexttospeech.com Plenary: I played a sample of students’ podcasts to the rest of the class. (see example below).  Continuing the theme of how data is stored in computers, in this week’s lesson, I focused on how sound is represented in a computer system. Learning Objectives:
Lesson 1: Theory (Sound) Suggested time: 50 mins Starter: I started the lesson by playing two samples of the same track (Tenacious D - Tribute “The Best Song In The World”), each compressed at different sample rates, which I downloaded from PWNICT: (http://www.pwnict.co.uk/computingGCSE/computingResources.html) - Click on 2.1.4 representation of data --> Lesson 5 Sound in Binary. You can find a direct link to the two samples below. After playing the two samples, I asked the students what they noticed about the two tracks. Theory: Next I explained that, in the previous lessons, we looked at how numbers and pictures etc. are stored in a computer using binary and that in this lesson we will explore how a computer stores sound. I explained that sound travels as a wave and showed students the following example. 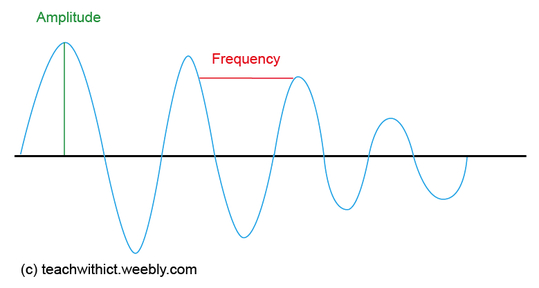 Next, I explained that amplitude controls how loud the sound is and the frequency controls the pitch. I then displayed the following example on the board: 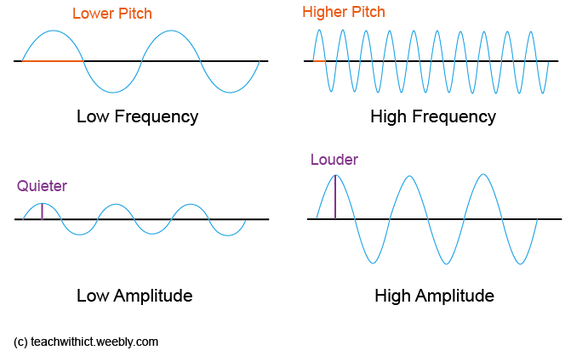 I followed this by explaining that sound waves are analogue and that, in order to store the waves digitally on the computer, we need to convert the waveform into a numerical representation so that the waveform can be stored in binary. To do this, we use an Analogue-to-Digital Convertor (ADC). I described how the ADC works by taking samples of the sound wave at regular intervals and displayed the following diagram: 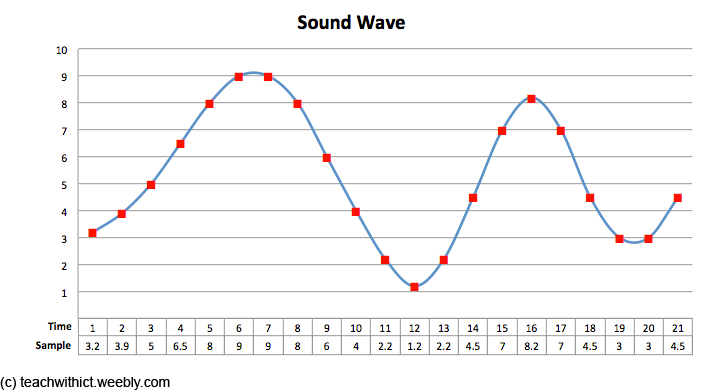 Next, I explained how the quality and size of the file is affected by two factors - sample rate and bit rate. I explained that the sample rate refers to the number of samples taken every second and that the greater the frequency of the samples, the better the sound quality. I also explained that the bit rate refers to the number of bits used to store each sample and that the more bits that are sampled, the better the accuracy of the file but also the greater the file size.   Finally, I played the two samples from the beginning of the lesson and asked the students if they could identify which one was converted using the lower sampling rate. Main: Students were given the following spreadsheet and instructed to fill in the following samples and map out the sound wave:
Samples: 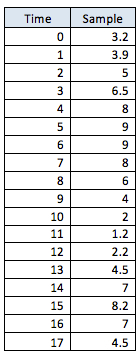 Alternative: Alternatively, students could use Audacity (Free) to explore how sound is stored on a computer. Students could be given an .MP3 file which they open in Audacity and zoom in to see the value of each sample. Students could then export the sound file using different sample rates and investigate the effect the sample rate has on sound quality.  Homework: Students were instructed to update their class revision wiki. Useful Resources: PWNICT - Excellent PowerPoint presentation from PWNICT – Computing Resources explaining how sound is stored on a computer - Click on 2.1.4 representation of data --> Lesson 5 Sound in Binary Classzone – Frequency / Amplitude simulator Binary representation of sound worksheet – Courtesy of Emma Partridge (via CAS). Download the worksheet here: http://community.computingatschool.org.uk/resources/1035 Extract from the CHRISTMAS LECTURES 2008: Chris Bishop - The Ghost in the Machine showing how sound is stored on a computer - Skip to 13:40.
Lesson 2: Python
Suggested time: 50 mins Main: Students were instructed to setup their Raspberry Pis and to launch IDLE 3. Students were then asked to continue to work through Mark Clarkson’s Introduction to Python booklet: (http://community.computingatschool.org.uk/resources/14) Alternative: Alternatively, if you do not have access to a set of Raspberry Pis, students can still complete the Python challenges: To install Python for FREE, go to the python.org website and download a standard installation of the latest version of Python. This will provide you with everything you need.  In this week’s lesson, I continued the theme of how data is stored in computers, this week focusing on how characters are represented in a computer system. Learning Objectives:
Lesson 1: Theory (Characters) Suggested time: 50 mins Starter: Students were given the following worksheet and asked to complete the tasks:
Main: I explained that, in the previous lesson, we have looked at how numbers are represented in a computer using binary. I then explained that characters are converted in the same way using something called a character set. Next, I explained that one of the most commonly used character sets is ascii (American Standard Code for Information Interchange). I then showed students the full 7-bit ascii table (See below).
I then explained that the ascii character set uses 7 bits which allows the computer to encode up to 128 characters. Finally, I gave students each a worksheet containing part of the ascii table (containing the letters A to Z in uppercase and lowercase) and asked the students to fill in the gaps in the table. Once complete, I asked the students to attempt the challenges on the worksheet (see below)
Resources: Representation of text - http://web.eecs.utk.edu/research/cs100modules/module3/index.html Ascii text to Binary converter - http://www.binaryhexconverter.com/ascii-text-to-binary-converter Ascii Binary conversion chart - http://www.nthelp.com/ascii.htm Text to Ascii and Binary converter - http://www.computingacademy.org.uk/text-ascii-and-binary-converter Lesson 2: Programming (Python)
Suggested time: 50 mins Main: Students were instructed to setup their Raspberry Pis and to launch IDLE 3. Students were then asked to continue to work through Mark Clarckson’s Introduction to Python booklet: (http://community.computingatschool.org.uk/resources/14) Alternative: Alternatively, if you do not have access to a set of Raspberry Pis, students can still complete the Python challenges: To install Python for FREE, go to the python.org website and download a standard installation of the latest version of Python. This will provide you with everything you need. In this week’s lesson, I continued the theme of how data is stored in computers, this week focusing on how a computer stores an image. Learning Objectives:
Lesson 1: Theory (Images) Suggested time: 50 mins Starter: I started by displaying a photograph of my Christmas jumper on the board and asking students what an image is made up of. I then explained that Pixel is short for Picture Element and showed the students a close up of my jumper showing each of the individual pixels: 


I explained that the image in my example was 1024 pixels x 768 pixels and that we call this the picture’s resolution. Main: I began by displaying a simple 1-bit image on the board and asked students to suggest how it could be converted to binary: 
The students, at first, suggested using 00 for “white” and 01 for “black”. I then asked if there was an even simpler way, to which the students suggested 0 for “white” and 1 for “black”. I then showed students the previous example in binary: 
I explained that images are stored in “scan lines” and that each line is encoded from left to right --> top to bottom. Next, I asked students how we could represent 4 colours in binary. Once they got the correct answer, I showed them the following example: 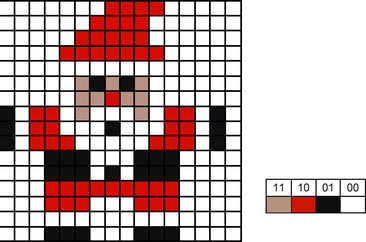
I followed this by displaying the following two images side-by-side on the board and explained that, for some reason, the computer had missed out two lines of code when importing the image. I then asked for volunteers to fill in the gaps: 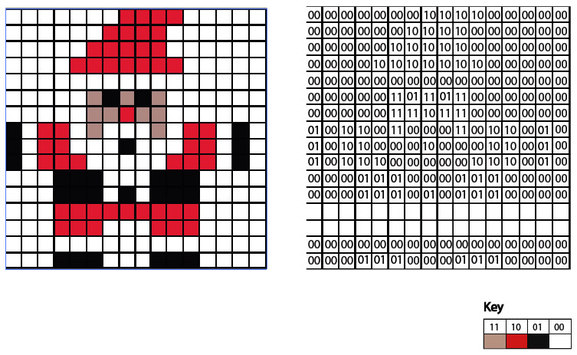
I explained that we call this representation of colours a “bit-plane” and that each bit doubles the number of available colours i.e. 1-bit would give us 2 colours, 2-bits would give us 4 colours and 3-bits would give us 8 colours etc. I then asked students to suggest how we could store more colours such as 16, 256 etc. Next, I gave each students a pre-printed computer science cracker joke, each with a different challenge attached – tasks based on level of ability. (See below). I then instructed the students to complete the challenge attached to their cracker joke.
Extension task: I asked some students to share the hexadecimal / binary code of their favourite bitmap image with a classmate to see if they could convert it back to the original image. Next I wrote an example binary code on the board and asked the students how the computer would interpret the numbers (the idea being for the students to ask questions such as how many colours etc.) I followed this by asking students what does a computer need to know to be able to convert the image. I then explained that, in order for the computer to interpret the file, the computer needs to know:
I then explained that we call this “metadata” I finished by recapping the learning objectives using the Pose, Pause, Pounce and Bounce method. Example: Pose a question to the whole class e.g. Explain how a 16 colour image can be represented in binary Pause to give students time to digest the question and think of their answer. If the students are engaged, try holding the pause for a little while longer to build up the tension. Pounce: Quickly, select a student to answer the question. i.e. Insist the answer to the question comes from student A and possibly student B, directly and fast! Obviously, plan in your mind who you are going to direct the questions to before hand. Bounce the question or student's response on to another student (immediately after the pounce). e.g. Ask them if they agree with the students previous answer and to explain why. For more information about the Pose, Pause, Pounce and Bounce technique, visit: @teachertoolkit - http://teachertoolkit.me/2013/01/04/pppb-version2/ Keywords: 
Lesson 2: TouchDevelop Festive Pixel Challenge
Suggested time: 50 mins Main: Keeping the theme of pixels, students were shown an 8-bit image created using touchdevelop. Click here to see example. Students were then directed to the TouchDevelop Challenge Hour of Code tutorials (touchdevelop.weebly.com/hoc) and asked to create a festive 8-bit image of their very own. Once completed, students where asked to submit their apps to the TouchDevelop Challenge website: http://touchdevelop.weebly.com/student-blog.html Below is a sample of some of the artwork created by the students during the lesson: In this week’s lesson, I introduced my students to Hexadecimal - explaining why it’s used and how to convert to binary / denary and back again. Learning Objectives:
Lesson 1: Theory (Hexadecimal) Suggested time: 50 mins Starter: I started by showing two numbers on the board (one in binary and one in hex). 1101 1001 C9 I then asked the students, “Which is easiest to remember?” I explained to students that we often find it difficult to remember long sequences of numbers so, to make life easier, we can break the number down from 4 bits (a nibble) to 1-bit. Demonstration (Hexadecimal): Next, I explained that the smallest value we can have in 4-bits (nibble) is 0000 (0 in denary) and the largest value is 1111 (15 in denary) and that we needed to represent each value with a single digit. I then displayed the following table on the whiteboard and asked students to fill in boxes 0-9:
I then explained that when we reach 10, we hit a problem as we can only use the numerical values 0 – 9. I then asked the students to suggest ways we would represent the last 6 numbers without using numbers. I then explained that, to get around this problem, we substitute the numbers 10 to 15 with the letters A to F. I explained that we call this system Hexadecimal (or Hex for short). I followed this by showing the students the following table:
Next, I showed the students, using the following table, what happens when we get to the number 16:
I explained that when we get to 16, a 1 is added to the front of the next number (highlighting the similarity to the denary system when we go from 9 to 10). Next, I split the class into groups of three and gave each group a copy of the following table. I then asked them to fill in the blanks:
I finished by displaying the following table on the board and explained how it could help them in their exam:
Activity 1 (Denary <--> Hex): Next I explained that, for the exam, students are expected to be able to convert binary to hexadecimal. I then showed the students the following video: I then showed them an example exam question and challenged them solve it: (a) Convert the hexadecimal number 6A to denary. (You must show your working out). ................................................................................................................................. ................................................................................................................................. ............................................................................................................................ (2) I followed this by giving students a series of mini challenges (See answer sheet at bottom of this page):
Activity 2 (Binary <--> Hex): Finally I explained that, also for the exam, students are expected to be able to convert binary to hexadecimal. I explained that, in the exam, students are expected to be able to convert 8-bit binary numbers to hex. I then demonstrated how to do this using the following example: 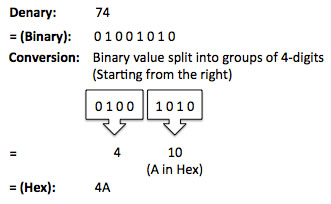 This was supported by the following help sheet:
I then showed the students another example exam question and challenged them solve it: (a) Convert the binary number 00111101 to hexadecimal. ................................................................................................................................. ................................................................................................................................. ............................................................................................................................ (2) Plenary: I finished by putting this all into context. I displayed the following table on the board and asked students if they recognised it. I then asked if they spotted anything familiar (based on the lesson). 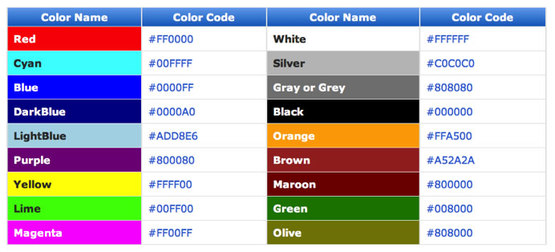 I explained that #FFFFFF = 1111 1111 1111 1111 1111 1111 in Binary which is 16,777,215 in Denary which also happens to be the same number of colours in a web palette! I then asked students to think what it would be like to have to use binary to change the colour of a webpage in HTML! Homework: Students were instructed to update their class revision wiki. Answer Sheets: Starter:
Activity 1:
Useful Links: How to do Decimal to Hexadecimal Conversion How to do Binary to Hexadecimal Conversion Lesson 2: Raspberry Pi - Introduction to Python
Suggested time: 50 mins Main: Students were instructed to setup their Raspberry Pis and to launch IDLE 3. Students were then asked to follow Mark Clarckson’s Introduction to Python booklet: (http://community.computingatschool.org.uk/resources/14) Alternative: Alternatively, if you do not have access to a set of Raspberry Pis, students can still complete the Python challenges: To install Python for FREE, go to the python.org website and download a standard installation of the latest version of Python. This will provide you with everything you need. In this week’s lesson, I continued the theme of how data is stored in computers, this week focusing on binary addition. Learning Objectives:
Lesson 1: Theory (Binary Addition) Suggested time: 50 mins Starter: I started with a fun starter activity courtesy of Mark Ward via CAS called Binary Bingo. To download the activity, click here. Each student was given a bingo card and numbers were picked at random using a free random name selector (see Classroom Management Tools). The first student to get a full house was the winner. Main: I began by writing a simple sum (adding to denary numbers together) on the board: 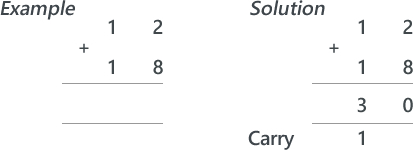 I then asked for a volunteer to solve it (showing all working out). Next, I introduced a simple binary sum: 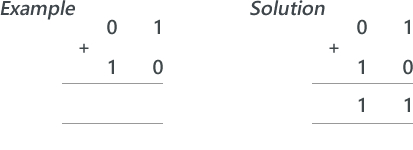 I explained that adding binary numbers is exactly the same as adding denary numbers however, instead of carrying groups of ten, you carry groups of 2. I followed this by writing a couple more simple binary sums on the board and asked for volunteers to attempt to solve these. Next I explained that when we add two 1s we need to carry over to the next column. I demonstrated this using the following sum: 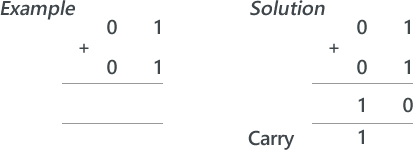 I followed this by asking students to work out the following (explaining their working out): 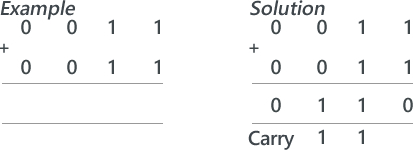 Finally, I wrote the following binary sum on the board and asked the students to solve it. I then asked the students if they spotted the problem. 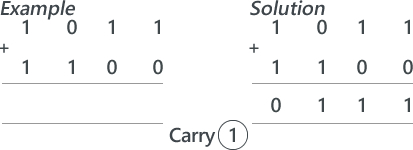 I explained that, if we only have 4 bits to store the result, there would be no room for the final carry – resulting in the wrong answer. I explained that when there isn’t room to store the resulting calculation, we get an error which we call overflow. Finally, I gave students a series of binary addition challenges courtesy of Chris Barnard via CAS. You can download the worksheet and answer sheet here: Binary Addition Exercise Extension: Students were directed to the following YouTube video explaining binary subtraction: Plenary: Students played the CISCO Binary Game: http://forums.cisco.com/CertCom/game/binary_game_page.htm Resources: Useful resources: Binary Calculator – http://gwydir.demon.co.uk/jo/numbers/binary/add.htm Binary Arithmetic Task - http://www.allaboutcircuits.com/worksheets/bin_math.html Lesson 2: Raspberry Pi - Python Challenge
Suggested time: 50 mins Main: Students were instructed to setup their Raspberry Pis and to launch IDLE 3. Students were then asked to attempt a series of introductory Python challenges courtesy of Tom Gilmour via CAS: http://community.computingatschool.org.uk/resources/332 Alternative: Alternatively, if you do not have access to a set of Raspberry Pis, students can still complete the Python challenges: To install Python for FREE, go to the python.org website and download a standard installation of the latest version of Python. This will provide you with everything you need. In this week’s lesson, I continued the theme of how data is stored in computers however, this time, focusing on binary to denary conversion. Learning Objectives:
Lesson 1: Theory (Binary) Suggested time: 50 mins Starter: I started by displaying my favourite binary joke on the board: “There are 10 types of people in the world: Those who understand binary and those who don’t” After a quick scan of the classroom to gage how many people got the joke, I explained to the class that I would reveal the punchline at the end of the lesson. Main: I began by explaining that data in computers is stored and transmitted as a series of zeros and ones. I followed this with a fun and engaging activity I found on CS Unplugged called counting the dots: http://csunplugged.com/sites/default/files/activity_pdfs_full/unplugged-01-binary_numbers.pdf I started by choosing 5 volunteers, and gave each volunteer one of five cards (each with dots on one side and nothing on the other). See attached: I began by asking the students what they noticed about the number of dots on each card (I waited for the students to identify that each card had twice as many dots as the previous card) I then asked students how many dots would the next two cards have and why. Next, I asked the 5 volunteers to flip their cards over one at a time and, with input from the rest of class, explained what each card represented. I followed this by asking the volunteers to make other numbers such as 6 (4-dot and 2-dot card) and 21 (16-dot, 4-dot and 1-dot cards). I then asked the students to flip over all their cards (so that all the dots were facing forward) and asked the rest of the class to calculate the total and explain how they worked it out. Finally, I challenged the volunteers to count from zero to 31 by flipping the cards in sequence. For an example of how to deliver this activity, see the video below: I finished this with a selection of worksheets courtesy of CS Unplugged (Click here) Plenary: Finally, I showed the binary joke on the board again and asked the students to explain the punch line. Lesson 2: Raspberry Pi Challenge Suggested time: 50 mins Starter: I started by asking the students “What factors (things/characteristics) make a difference to a computer’s performance?” I asked students, in pairs, to write down their answers and followed this with a discussion about obvious factors such as speed. Main: Next, to introduce the main task, I asked students “How can we test how factors such as CPU, memory and secondary storage can affect the performance of a computer?” The aim here was to encourage students to think about benchmarking through controlled experiments and recording their findings (I linked this to experiments they may have conducted in science and students to discuss how they could make sure the results of the experiments were both accurate and reliable). I then split the students into small groups of 3 and gave each group a copy of the OCR Classroom Challenge – Worksheet 8: How hardware characteristics can affect the performance of a computer (Click here). For the teacher version, which includes suggested possible outcomes, click here. I then instructed the students to power up their Raspberry Pis and attempt task 2 of the worksheet. (Note: This activity provides a perfect opportunity to reinforce hardware theory and encourages students to investigate how hardware characteristics such as CPU speed, memory and secondary storage can affect the performance of a computer.) Resources:
Extension:
Those students who were able to complete task 2, with time to spare, were asked to attempt task 3 of the worksheet. Alternative: Alternatively, if you do not have access to a set of Raspberry Pis, students can attempt some more hour of code tutorials on TouchDevelop: https://www.touchdevelop.com/hourofcode Plenary: Students were asked to share their results from Raspberry Pi task with the rest of the class and discuss the findings. Teaching Computer Science - Day 9: Bits n bobs Not much to report this week as I have been at the UK Skills Show demonstrating Kodu, TouchDevelop and Project Spark however, in my absence, I left this cover lesson on "Units of data". Learning Objectives:
Lesson 1: Theory (Units of Data) Suggested time: 50 mins Starter: Students were asked to watch the video “Units of Data Measurement” from 60secondmindmeld.com. After watching the video, students completed the following worksheet: Units of Data Worksheet Main: Students were asked to investigate different units of data and to create a revision resource which explains the terms bit, nibble, byte, megabyte, gigabyte and terabyte. Students were then instructed to create a new page in their revision wiki called “Units of data” and upload their finished resource. Resources: PWN ICT – Units of Data.pptx Teach-ICT - Representing Data OCR - Representation of data in computer systems Cambridge GCSE Computing Online - Definitions of units Lesson 2: Programming (TouchDevelop)
Suggested time: 50 mins Main: Students were instructed to sign in to TouchDevelop (www.touchdevelop.com) and attempt the hour of code tutorials: https://www.touchdevelop.com/hourofcode Once completed, students where asked to submit their apps to the TouchDevelop Challenge website: http://touchdevelop.weebly.com/student-blog.html Below is a sample of some of the games created by the students: Falling rocks game: https://www.touchdevelop.com/hvlca Another falling rocks game: https://www.touchdevelop.com/fkspa Turtle drawing: https://www.touchdevelop.com/mbiib Loves me not game: www.touchdevelop.com/sliwb Plenary: Students were invited to try out each other’s apps.  In my eighth lesson, I decided to give my students a test to see what they had learnt so far. I followed this with an introduction to the Raspberry Pi. Learning Objectives:
Lesson 1: Theory Test Suggested time: 50 mins Test: I used the Hardware theory test (OCR Unit 2.1.2) courtesy of Mark Clarkson. You can download the test for FREE here: OCR GCSE Computing Hardware Unit Test Plenary: I asked students to swap papers and went through the answers. I also explained to students the model answers using the marking criteria (Click here) Lesson 2: Introduction to the Raspberry Pi Suggested time: 50 mins Starter: I split the class into groups of 4. I then gave each group a boxed Raspberry Pi and worksheet (See below).
After handing out the worksheets, I asked the students to un-box their Raspberry Pis and try to identify each of the different parts of the device using their worksheet. (This is also a great opportunity to recap some of the Hardware theory elements such as CPU, Input / Output, memory and storage etc.). Alternatively: You could also use the Interactive Flash based Drag-and-drop version which can be found on the OCR website: http://www.ocr.org.uk/Images/127399-raspberry-pi-drag-drop-activity.swf Once all the students had filled in their worksheets, I reviewed their answers. What is a Raspberry Pi? The Raspberry Pi is a low cost, credit-card sized, programmable computer which has been developed by the Raspberry Pi Foundation. How can I get hold of one? You can buy the Raspberry Pi through a variety of online retailers such as Amazon, RS Components, CPC, maplin etc. How much does one cost? The Model A will typically cost £20 and the Model B £30. Note: this does not include the SD Card, keyboard, mouse and monitor required to use the Pi. It is assumed that most of these components will already available in school. SD cards can be picked up relatively cheaply online. To find out more about the Raspberry Pi, visit the official website. Note: As part of their drive to encourage the teaching of computing, OCR are offering free Raspberry Pis to schools who wish to increase the engagement of Computing and IT. To express your interest in receiving FREE Raspberry Pis for your school, visit the following link and complete the attached form: http://www.ocr.org.uk/qualifications/by-subject/computing/free-raspberry-pi/ Main:
I divided the class into pairs and gave each pair a Raspberry Pi, SD Memory Card and set of instructions for setting up the Raspberry Pi. I then instructed the students to connect and setup their Pis. Note: The Raspberry Pi do not come with a pre-installed Operating System therefore, the students will have to install the OS themselves. This is a good opportunity to introduce the software theory element of the course and explain the importance of the Operating System. You can download a disk image of the operating system from the official Raspberry Pi website www.raspberrypi.org/downloads (The recommended operating system is Raspbian “wheezy”). In order to write the disk image (.img) file to the SD card you will need a program called Win32 Disk Imager. Download Here. Due to network restrictions and as Win32 Disk Imager, if used incorrectly, can harm your machine, for the purpose of this task, I provided the students with an old laptop with the Disk Imager software already installed and a copy of the latest Raspberry Pi OS in (.img) format on a USB pen. Extension Task: Students attempted the OCR “Raspberry Pi Architecture Classroom Challenge” http://www.ocr.org.uk/Images/125296-classroom-challenge-architecture-learner-sheet.pdf Model answers for the challenge can be found here: http://www.ocr.org.uk/Images/125297-classroom-challenge-architecture-teacher-sheet.pdf  With no lesson this week due to inset, I thought I would take a look at how you can make the most of your computing lessons. Even if you are lucky enough to have two hours or more a week to deliver your computing lessons, you may feel there is not enough time to cover everything. One of things I have started to do, to make best use of class time, is to flip my classroom. What is classroom flipping? If you are new to the idea of the flipped classroom, the concept is simple: the flipped classroom essentially reverses the traditional way of teaching i.e. what is usually done in the classroom, such as lectures, is done as homework and what is usually done as homework is done in the classroom. The benefit of this model, particularly for teaching Computer Science, is that the teacher can spend more time interacting with students. There are many ways to facilitate classroom flipping. In this post I explore some of these ways and look at tips for getting the most out your flipped classroom. 1. Video Tutorials Otherwise known as vodcasting, the most common way to flip your classroom, is to use teacher created videos which students can view outside of the classroom. There are several ways that you can share your videos with your students – probably the most popular being YouTube (www.youtube.com) however, you can also use other video sharing sites such as SchoolTube (http://www.schooltube.com), TeacherTube (http://www.teachertube.com), or if your school has one, your schools own VLE. The added bonus of using video sharing sites such as YouTube is that videos can be grouped into playlists and embedded into any web based tools such as the school's VLE, wiki, blog or website. You can also add useful videos from other contributors to build your playlists. Students can follow the lecture for homework and use lesson time to explore concepts in more detail. For examples of how you can use video tutorials to flip your computing classroom, visit Mark Clarkson's YouTube Channel: (http://www.youtube.com/user/mwclarkson) 2. Wikis A wiki allows groups of people to collaboratively develop websites with no prior knowledge or experience of website design. In the flipped classroom, a wiki can be used to host instructional videos and associated resources to introduce a concept or deliver a lesson. Students can then update the wiki and summarize what they have learned. Free tools such as PBWorks (http://pbworks.com/education) and Wikispaces (http://www.wikispaces.com) are ideal for creating classroom wikis. Wikispaces Classroom builds on the collaborative editing features of a wiki but includes some additional functionality to support the flipped classroom, features such as social interaction and formative assessment. Teachers can also monitor how often a student has read, edited or saved a page. To find out more about how to use wikis in your classroom, click here. 3. Blendspace This powerful web 2.0 tool allows you to organize and share content such as videos, images, documents and text using its intuitive drag and drop interface. The tool also allows you to create online lessons by embedding content from popular sites such as YouTube, Google, Vimeo, Flickr etc via its built-in search tool. You can also upload content from your computer, Dropbox or Google Drive. Blendspace is ideal for flipping your classroom – students can research a topic at home and use lesson time more effectively. As a teacher you can monitor students progress and measure students understanding with the built-in quiz creation tool. You can even check to see if your students have actually viewed the resources you have shared with them. 4. Podcasting Podcasts are a wonderful way of allowing both teacher and students to share their work and experiences with a potential huge audience over the Internet. A podcast is like a radio show however, instead of being broadcast live, a podcast is pre-recorded and then distributed over the internet or to a mobile device allowing your students to listen to them when and where they please, even on the bus ride home. There are plenty of ways to share your podcast, probably one of the most famous being iTunes however, another tool worth considering is Audioboo. Audioboo is a free social-podcasting environment. With Audioboo, students and teachers can create podcasts (or boos) which can be shared with other social teaching tools such as edmodo. Probably the best example of using podcasts to support the teaching of Computer Science are those by Alan O’Donohoe: http://audioboo.fm/users/104685/boos 5. Learning to code online With online tools such as CodeAcademy (http://www.codecademy.com), LearningStreet (http://www.learnstreet.com) and Khan Academy (http://www.khanacademy.org/cs), it has never been easier to learn how to code and now, thanks to such tools, it's never been easier to flip your computing classroom. Using the flipped classroom model, students can learn the basic syntax outside the classroom thus allowing the teacher to use classroom time for problem solving and supporting students with practical tasks. Tips for flipping your classroom:
I’m not going to lie to you, flipping your classroom is not without it’s pitfalls however, get it right, and the results can be extremely rewarding. Here are some tips to help you along your way:
|
AuthorSimon Johnson 
Microsoft Innovative Educator Expert / MIE Trainer

Minecraft Cert. Educator / Global Mentor
CAS Master Teacher
Raspberry Pi Cert. Educator

Tickle Ambassador
Archives
June 2017
CategoriesAll Algorithms Cpu Fundamentals Hardware Input & Output Memory OCR A451 Software Storage |
|||||||||||||||||||||||||||||||||||||||||||||||||||||||||||||||||||||||||||||||||||||||||||||||||||||||||||||||||||||||||||||||||||||||||||||||||||||||||||||||||||||||||||||||||||||||||||||||||||||||||||||||||||||||||||||||||||||||||||||||||||||||||||||||||
Search by typing & pressing enter
 RSS Feed
